This post contains helpful tips and tricks! If you’re in a rush, please use the “Jump to Recipe” above! Jump to:💭Why you’ll love this recipe 📋 Ingredients and notes 📋 Step-by-Step Notes (Stove-top)♨️ Instant Pot Notes 🍴 Serving and storage suggestions📖 Recipe💬 Comments
💭Why you’ll love this recipe
While most Indian “curries” are vegetables cooked with spices, there are two things that are special about this recipe:
Easily adaptable mash of vegetables, cooked in spices: so they take on each other’s flavors, and the flavors of the spices (also: your kids can’t pick out big chunks of vegetables - so they’ll get their fill of veggies with zero way of knowing that they’re eating veggies). You can use pretty much any vegetable in the mash so it’s a great “clean your fridge” type of meal that everyone will lovePerfect combination of salt + fat + acid + heat (I heart Samin Nosrat). Indian dishes sometimes have competing flavor profiles (which is a defining feature of the cuisine) but this dish is a perfect marriage of all the flavorsSuper versatile: This recipe is perfect regardless of whether you’re hosting friends for game day, looking for a quick weeknight dinner, or something your kids will love!Can be made stovetop or in Instant Pot (one pot, either way!) - I have detailed instructions to make this recipe and it works great both ways!
📋 Ingredients and notes
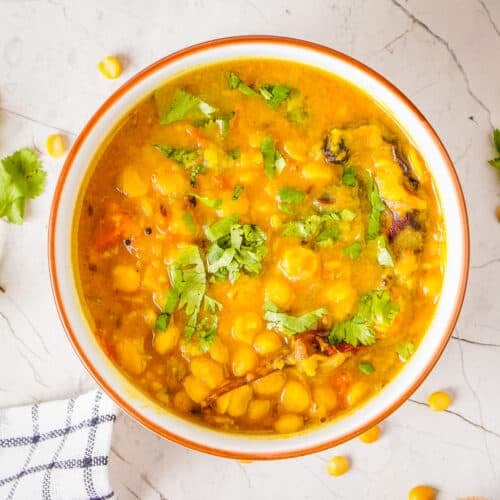
My recipe is based on a restaurant style pav bhaji, can easily be made in one pot, and the only recipe you’ll need! It’s broken into three chunks of ingredients:
Pav (fluffy bread roll) Vegetable mash which requires vegetable oil, and a couple of vegetable (more below) Pav Bhaji Masala (i.e. the spice blend!)
🍞 Right bread for pav bhaji (i.e. the pav)
Serve this dish with savory or unsweetened bread (try to shoot for something with 1-2 grams of sugar if possible). Any type of potato roll, dinner rolls, or burger buns will typically do the trick. You want the bread to be fluffy and not extra sweet. But in a pinch, almost any bread would do. It’s all about toasting the bread! As a kid, I remember my dad toasting the pav buns in salted Amul butter. So, I suggest you use salted butter or ghee!) If you’re vegan, use avocado oil or vegan butter! If you’re gluten free, you can use a gluten-free variant of your favorite bread.
🥗 Vegetables for pav bhaji (i.e. the bhaji)
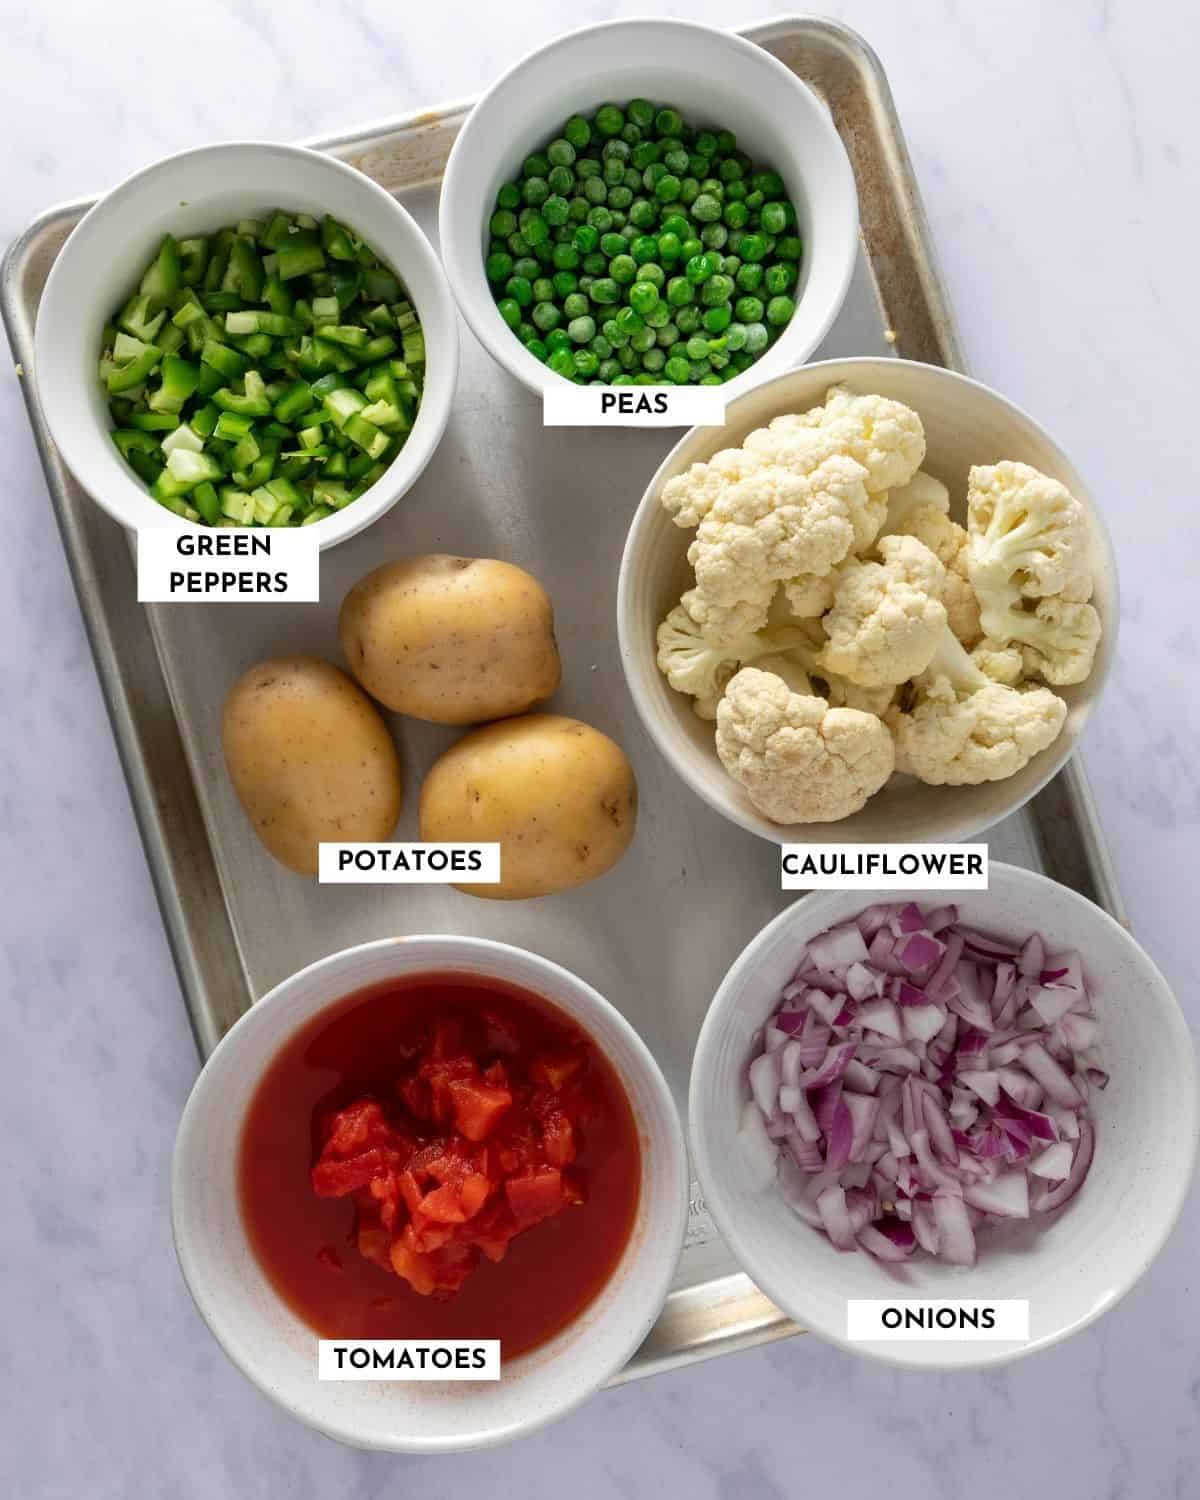
If you eat on the streets of Mumbai, most vendors will primarily use onions and potatoes because some of the other vegetables like peas, cauliflowers and green bell peppers (i.e. capsicum) are typically more expensive. So, you can make this dish with just potatoes and onions if you have those. There are six vegtables that I strongly suggest you use - potatoes, onions, tomatoes, peas, green bell peppers, and cauliflower. This typically produces the taste and texture that’s closest to what you find in India. A couple of notes on substitutions here:
Use fresh or canned tomatoes. I use fresh tomatoes in the summer and canned tomatoes rest of the year. Try to use pureed tomatoes. If you only have diced tomatoes, try to blend them up before you use them. Don’t skip out on green peppers! I tend to use spicier variants (because of my spice loving partner) but green bell pepper provides a tangy flavor that complement the spices used in this dish. Other bell peppers (yellow or red) are sometimes too sweet. Other vegetables are okay too! I’ve seen some folks use beets in this dish to enhance the flavors and colors. You can also use carrots and/or eggplants!
🧂 Three types of pav bhaji masala
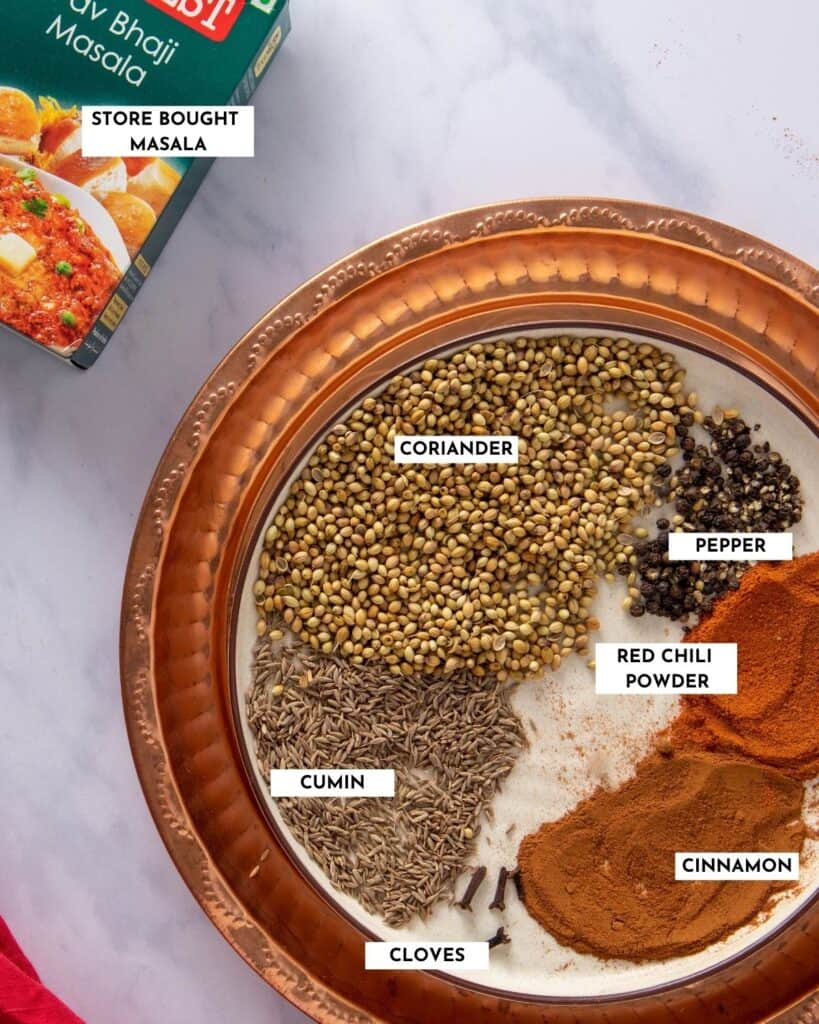
There are three ways in which you can replicate the authentic taste of this dish - using a homemade masala, improvising your garam masala, or using storebought pav bhaji masala. Let’s go through each of them. Homemade pav bhaji masala This is the recipe I use at home for a simple but authentic masala. I dry roast these spices on medium heat, and then once they’re cool, I grind them up in a spice grinder.
3 tablespoons coriander seeds1 tablespoon cumin seeds1 teaspoon of Kashmiri red chili powder4 cloves 1 teaspoon black peppercorns1 teaspoon cinnamon powder (or a 1" cinnamon stick)
This list is for the basic version of the masala but there are many variants. If you don’t have coriander or cumin seeds, you can substitute with ground versions - 1 tablespoon of ground coriander and ½ tablespoon of ground cumin powder. You can also add amchur powder (dried mango powder) on hand, you can add that. Fennel seeds, and/or black cardamom are also used!
Improvising garam masala
If you have garam masala, just add 3 teaspoons of that to 1 tablespoon of ground coriander and 2 teaspoons of red chili powder (I use Kashmiri red chili powder which packs a punch - for a tamer variety, use paprika).
Storebought pav bhaji masala
📋 Step-by-Step Notes (Stove-top)
There are only three steps for making the perfect pav bhaji. The instructions here are written to cover those who don’t have a pressure cooker. If you have one of those or an Instant Pot, jump to the Instant Pot notes section. If you want to make this with one pot, follow first two steps in the same pot.
Cook and mash the potatoes and cauliflower
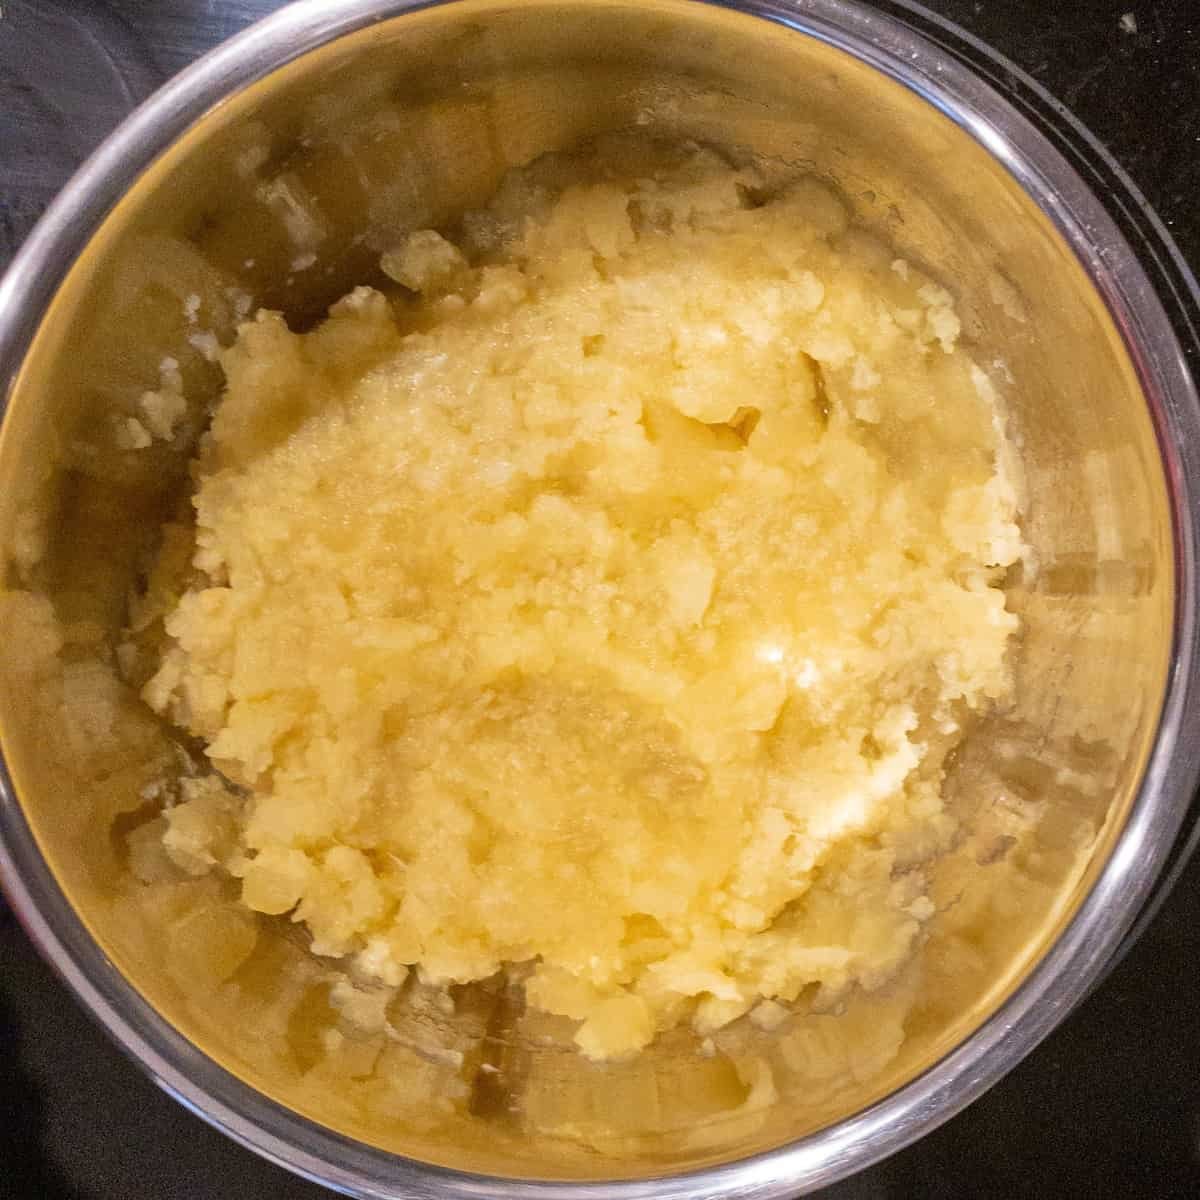
I typically start with this step because it takes a while. Chop the cauliflower into florets. Peel the potatoes, and chop them into quarters. I like peeling mine before boiling, but you can also quarter and drop them in the water. The peel comes off cleanly afterwards. Add the potatoes and the cauliflower to boiling water with a pinch of turmeric. Boil them for about 20 minutes until a fork inserted into the potatoes will smoothly go through. Mash this up nicely. Then set aside.
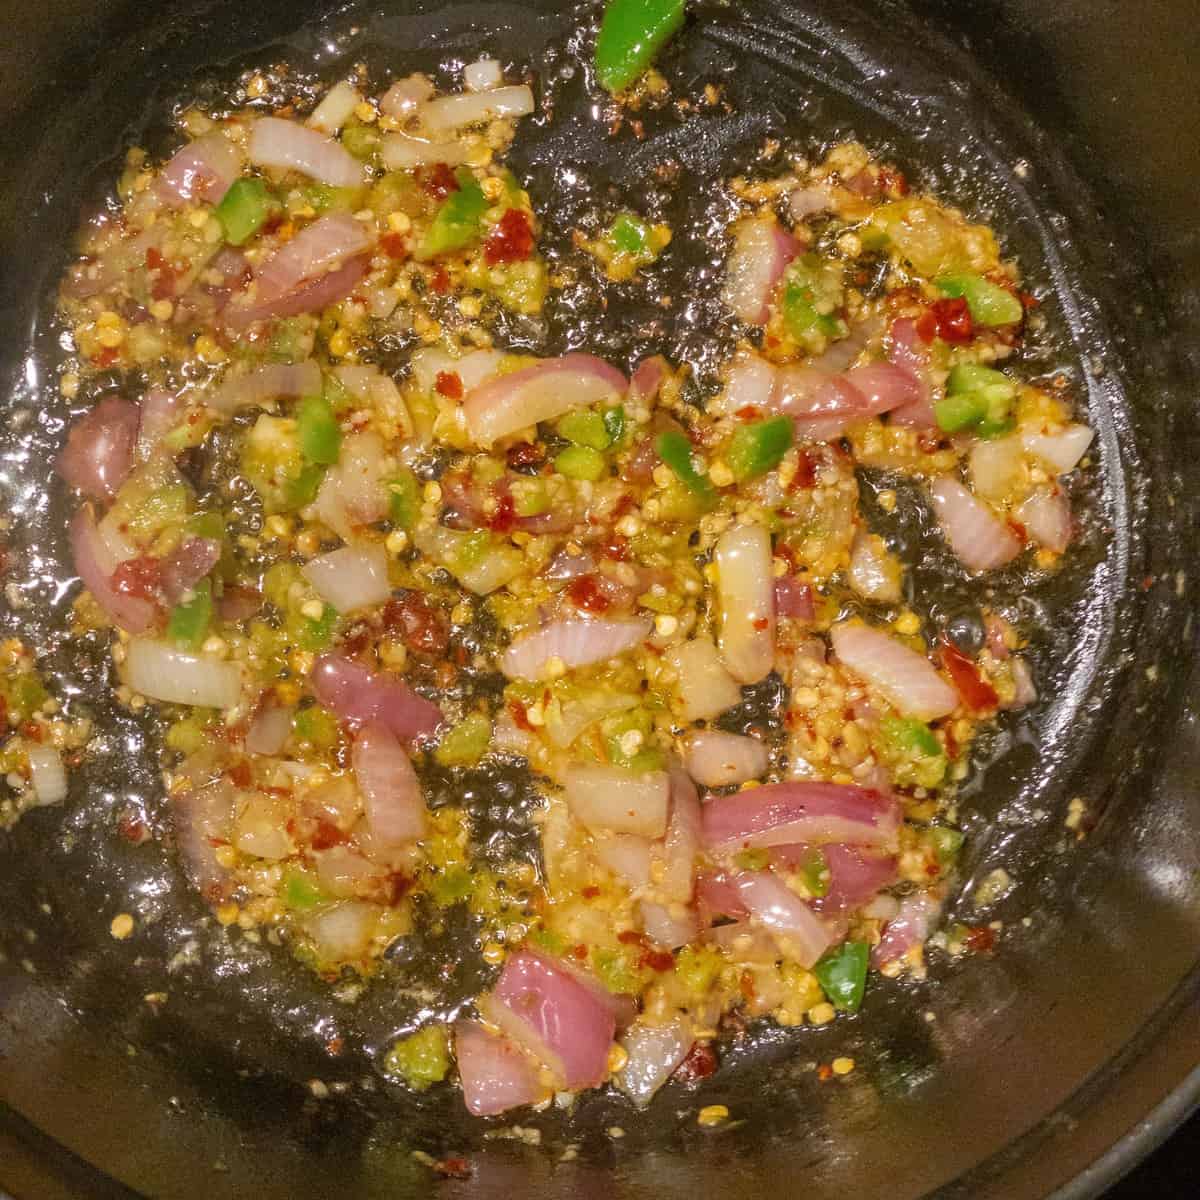
Make the bhaji base masala
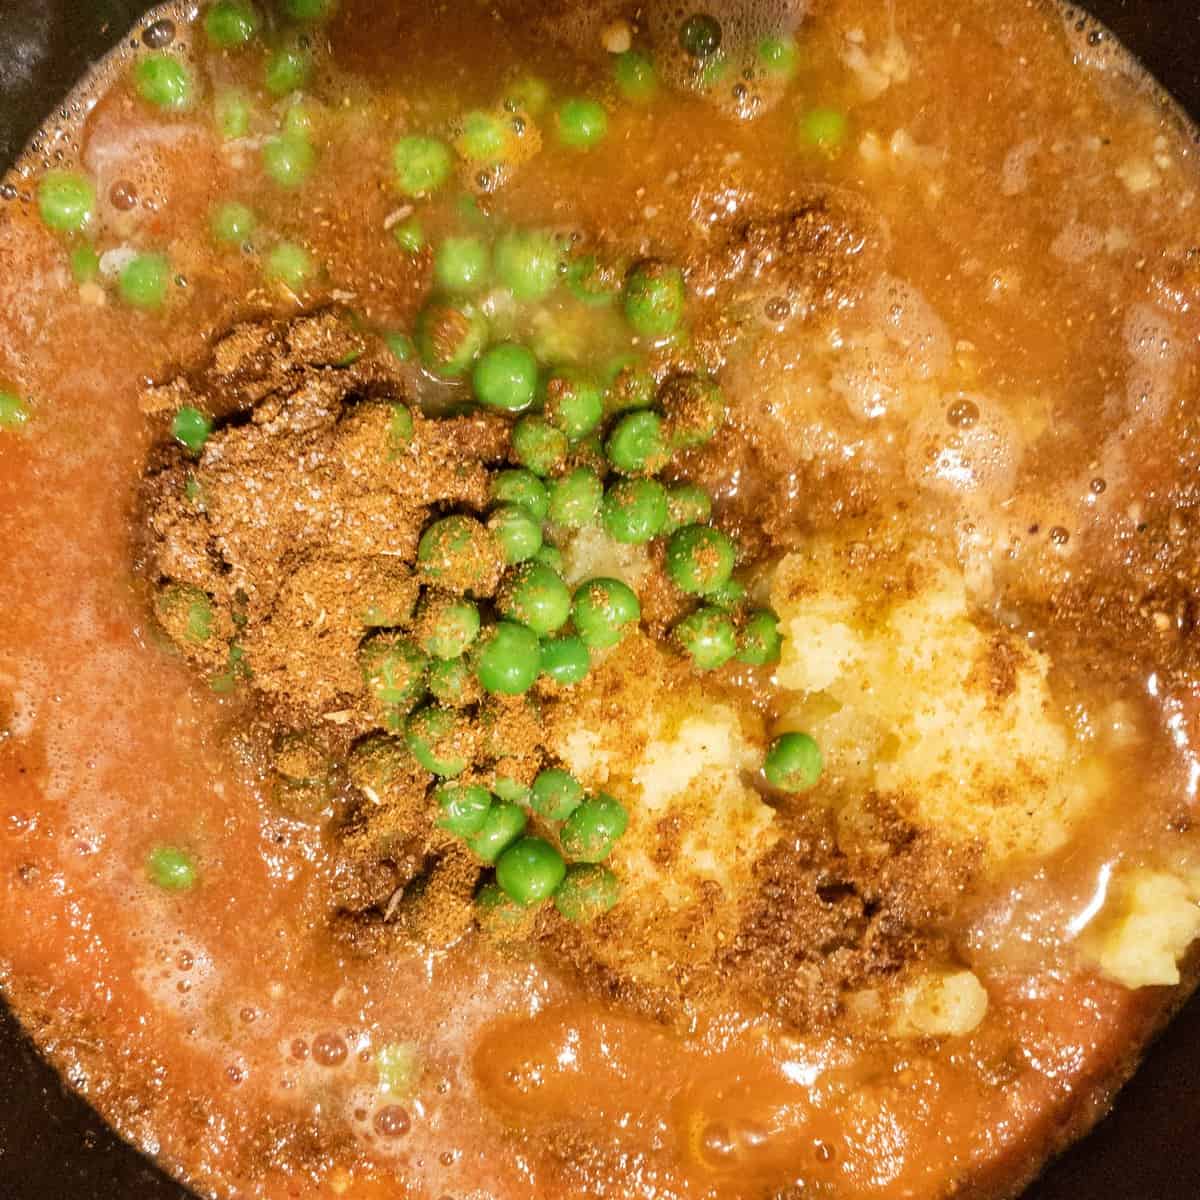
If you’re making the spice mix from scratch, make it while the veggies are boiling. Otherwise, in a pot or large, deep pan, heat some oil. Add chopped red onions and green bell peppers and saute until brown. Then, add ginger-garlic paste. Saute this for a few seconds until fragrant, add pureed canned tomatoes, and cook on high heat for a few minutes. Once the tomatoes are cooked, add the potatoes, cauliflower, and peas as well as salt and two tablespoons of the pav bhaji masala. Then, add about 1-1.5 cups of water, and mash all of them together again using the back of a wooden spoon or a masher. Stir every once in a while to make sure they don’t stick. The final consistency should be fluid, but not too watery.
Toast the pav, serve with accompaniments
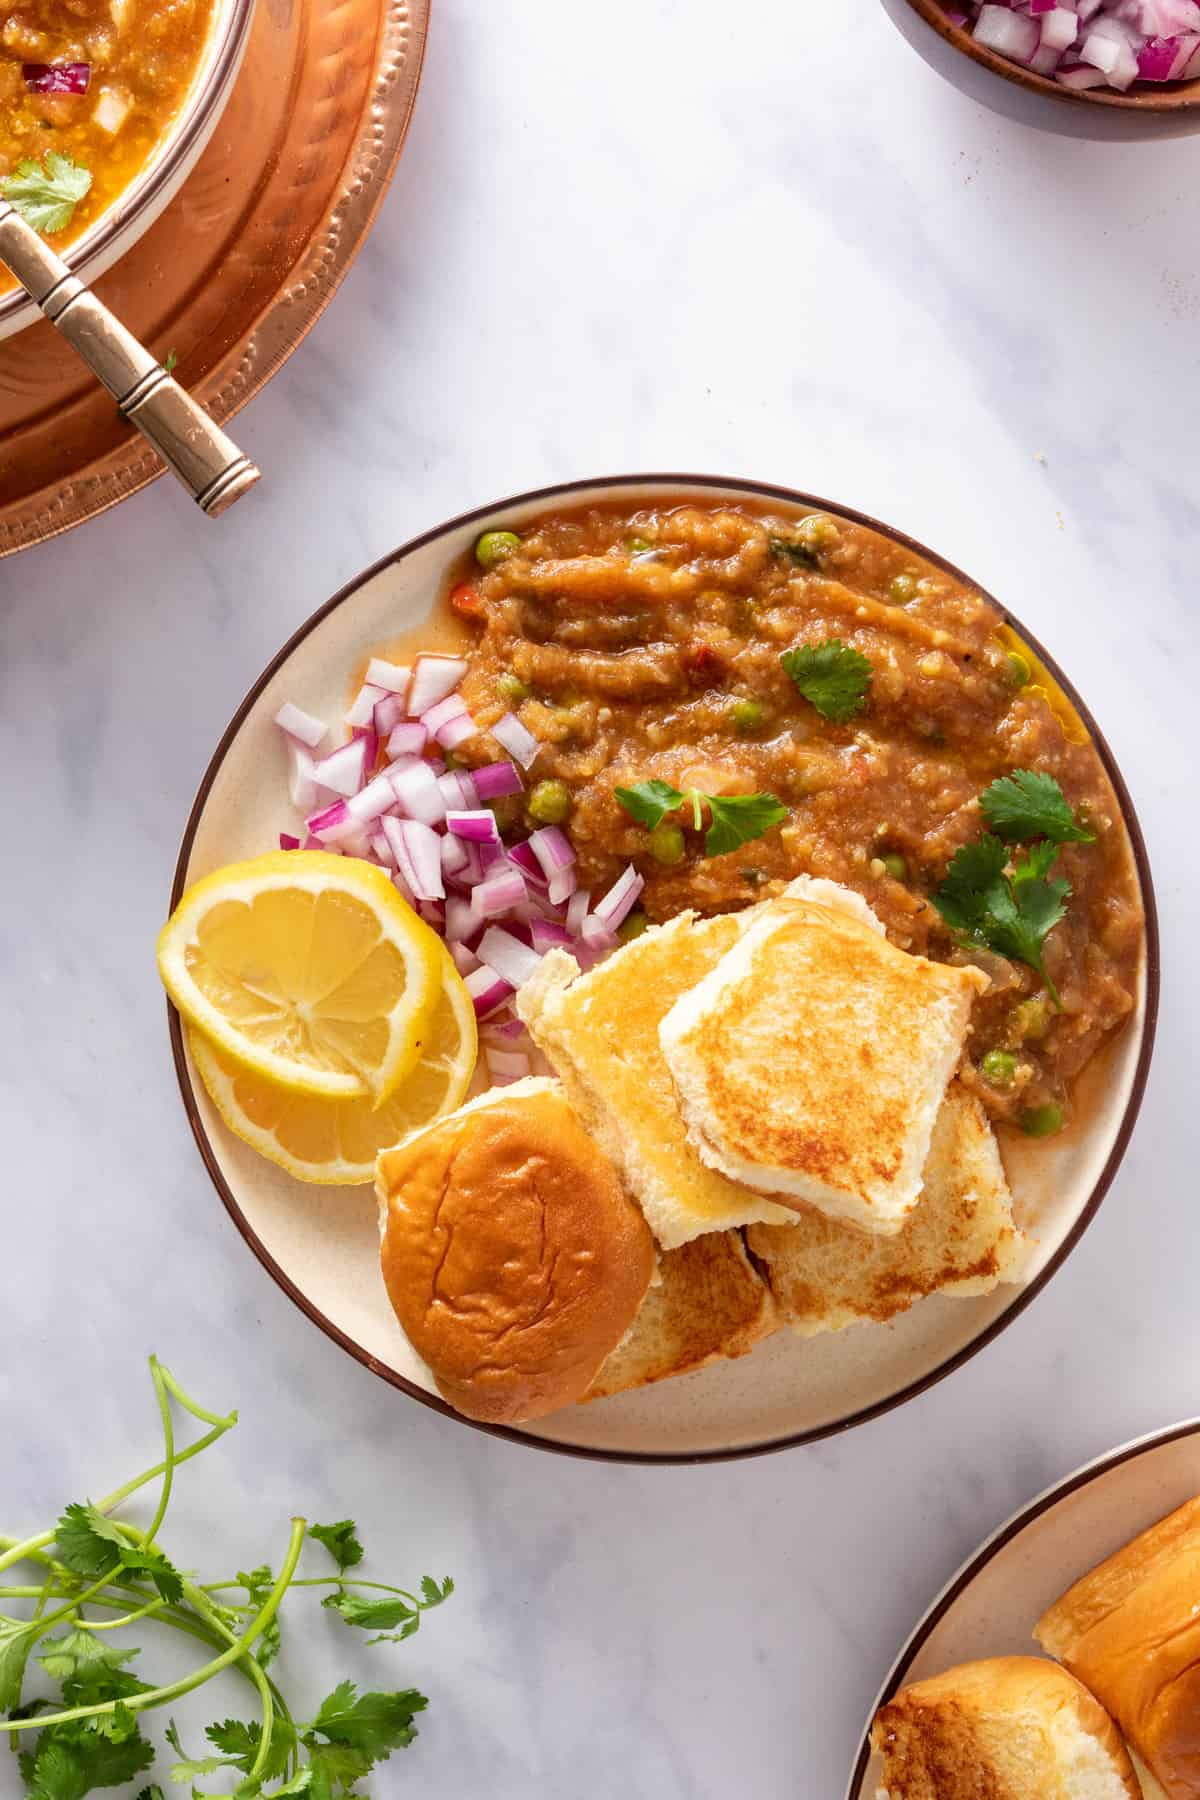
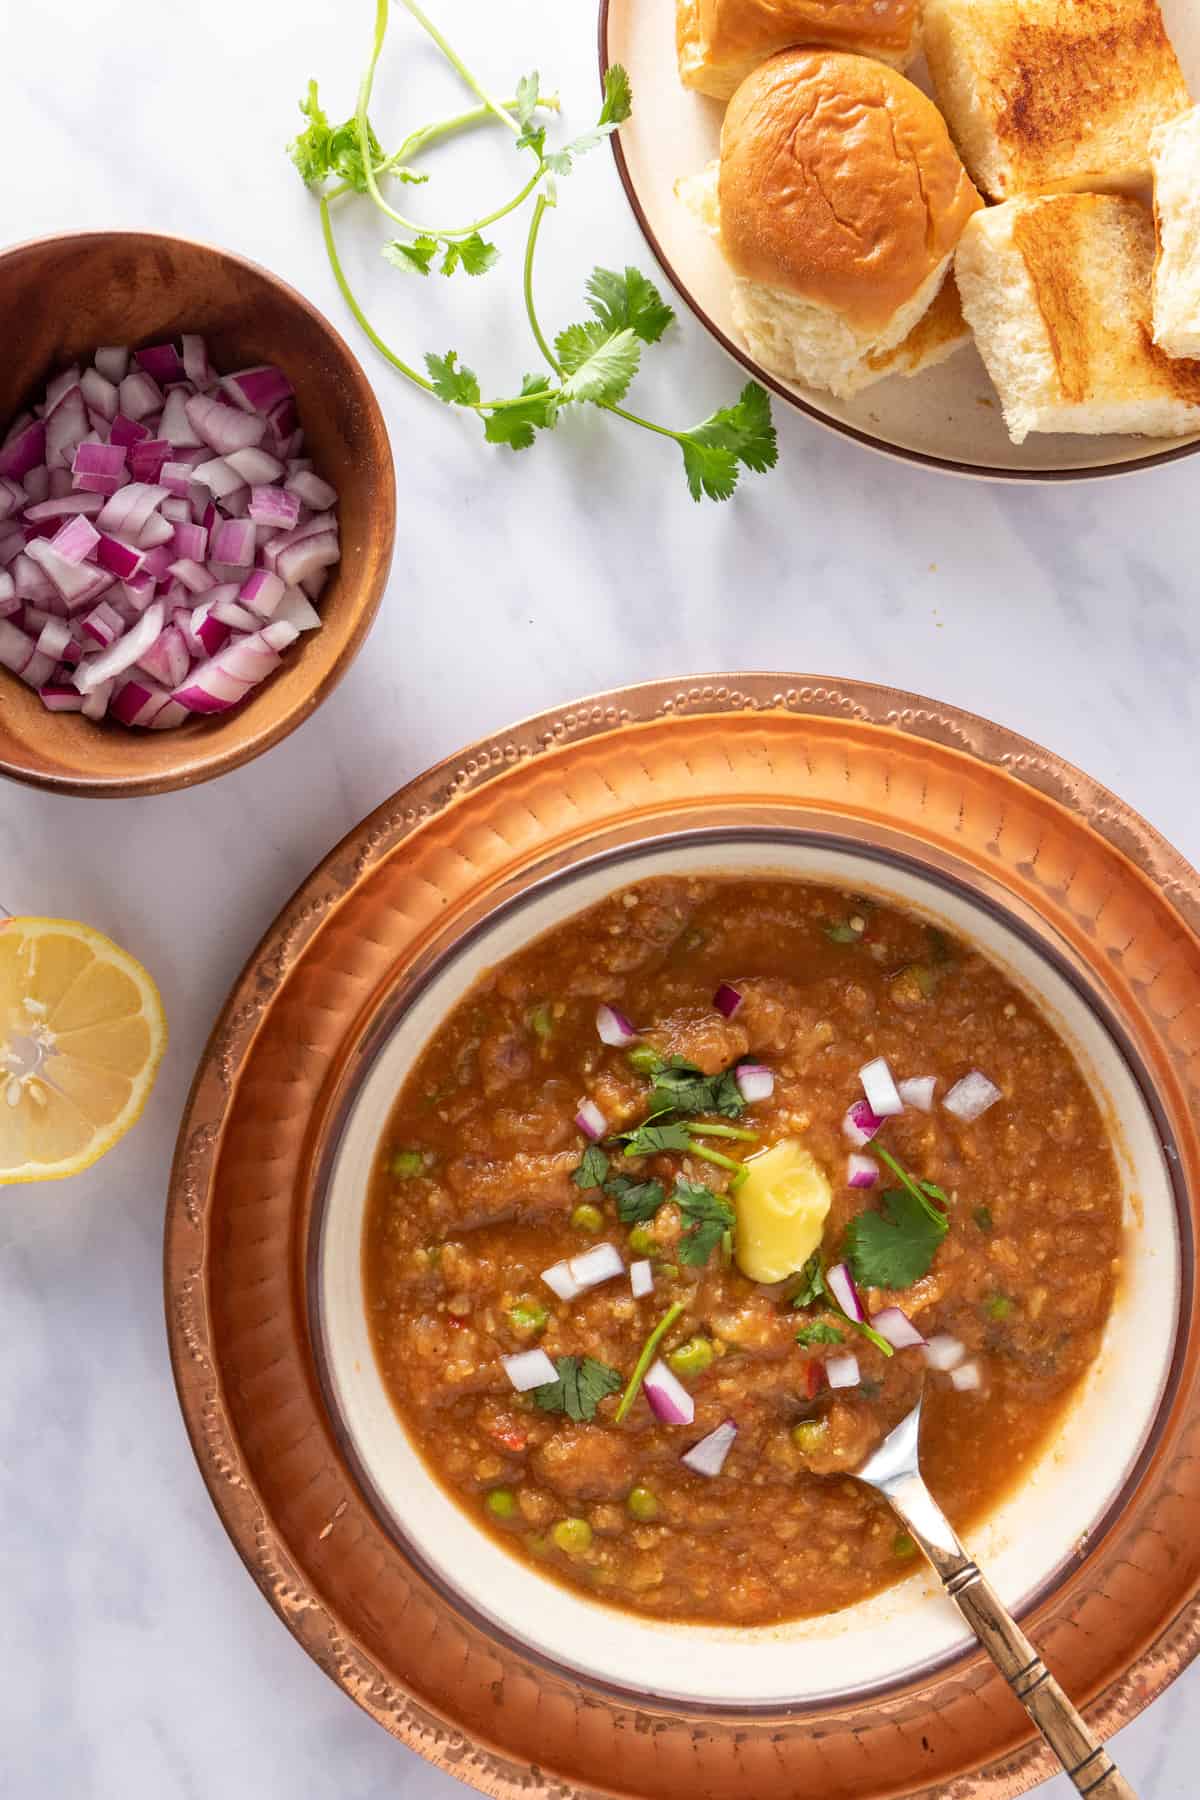
While the final step of the bhaji is cooking, toast your pav on a pan with salted butter. This is such a key step! I typically slice through the dinner rolls (but not all the way through, so they’re attached at one end). Then I add a dollop of butter, press the rolls with the cut-side down and toast them until they’re crispy (a nice golden brown). Serve two toasted dinner rolls with some bhaji and a dollop of butter on top. Also serve some cut up red onions, 1-2 lemon wedge slices (which you’ll squeeze on top of the bhaji) and some cilantro as garnish.
♨️ Instant Pot Notes
If you have an Instant Pot or a pressure cooker, this dish can be sped up quite a bit. You can either use the Instant Pot to just pressure cook the potatoes and cauliflower, or you can make the whole dish (minus buns) in it. For the former, just pressure cook the potatoes and cauliflower for about 10 minutes on the high setting. For the latter, start by sautéing the onions and green bell peppers on the sauté setting. Then add the ginger-garlic-chili paste, and sauté for a few more seconds. Then, add all the vegetables and about 1.5 cups of water and pressure cook on high for 8-10 minutes. Release the pressure, turn it back to the sauté setting, add two tablespoons of pav bhaji masala as well as salt and mash it all up nicely. Sprinkle with cilantro and you’re done.
🍴 Serving and storage suggestions
If you have extra bhaji, you can store in an airtight container for up to 2 days in the fridge. The flavors of bhaji will actually intensify during this time, so if you want to lighten it when you’re reheating, add a pinch of butter or some water. If you want to freeze, you can portion into individual portions, and freeze for up to 3 months. You can thaw before you reheat (either microwave or stovetop). If you are looking for other Indian recipes, check out: If you tried this recipe, don’t forget to comment and rate! ⭐⭐⭐⭐⭐
📖 Recipe