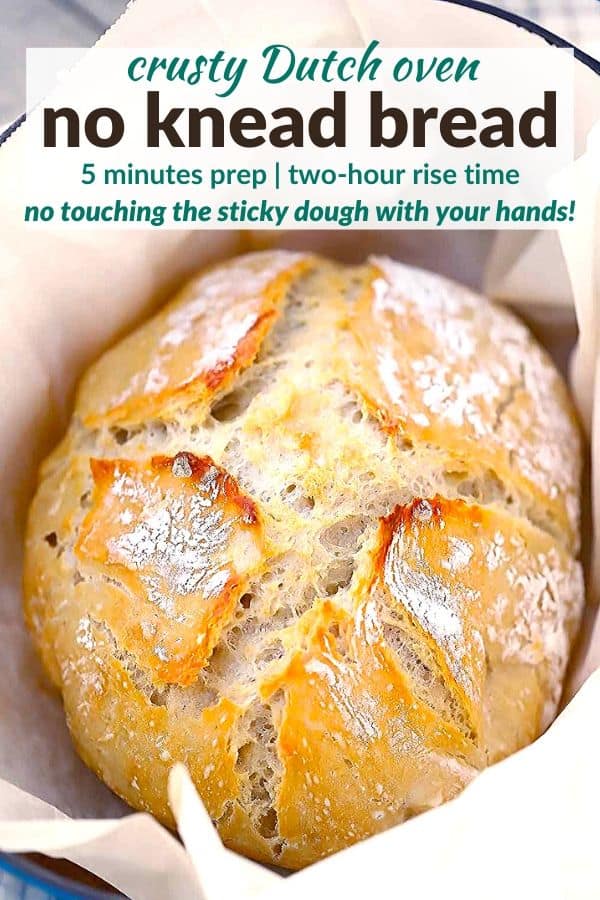
I’m a good cook. I mean, I’m allowed to brag about that… I’ve built a career out of it with this website. But until now, I’ve had the HARDEST time making a good homemade bread. Am I alone in this? Homemade bread has always eluded me and been a real challenge. My homemade breads have always been too flat, too dry, too hard, too annoying and sticky to work with, etc. UNTIL NOW. YOU GUYS. I finally cracked the code for homemade bread that isn’t a hassle and is so amazingly delicious, moist, with fluffy holes, and with the perfect crusty crust! You can use all-purpose flour – no need for fancy bread flour! This is the only no knead bread recipe you’ll need, and it’s great for beginner bread bakers. The Dutch oven is key for developing a perfect crusty crust and keeping the inside perfectly moist, and best of all, you don’t EVER have to touch the super sticky dough with your hands! You can let this dough rise for only 2 hours and bake it right away, OR you can keep the dough in your fridge for up to 7 days and use when you want to. Unlike other no-knead bread recipes that require 12 hours minimum rise time. Here are all the details.
First of all, what is no knead bread?
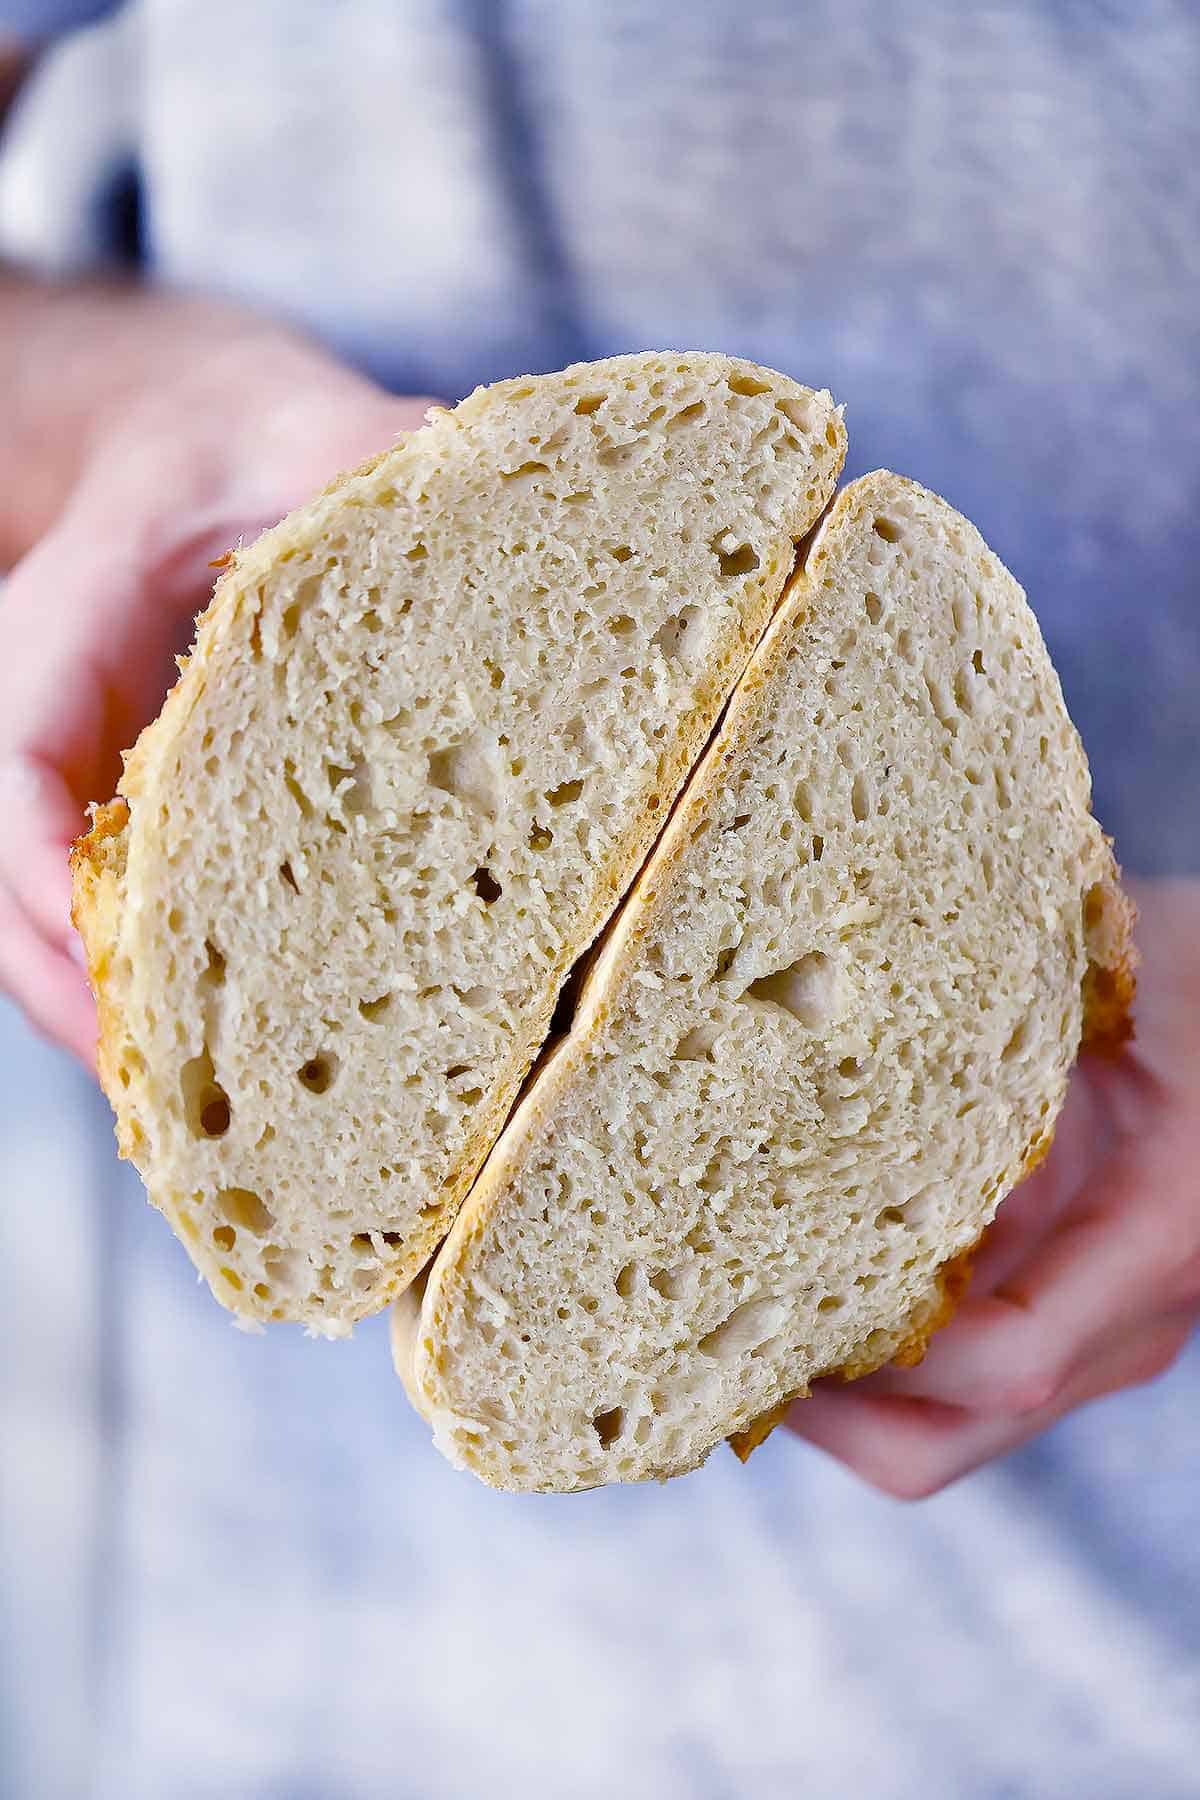
No knead bread is, as the name suggests, bread that can be made without kneading the dough. No need to knead. Hah! The dough is notoriously very loose and sticky, which can make it a little frustrating to work with (which is why I developed this method to not touch it at all- it takes a lot of that frustration away!). No knead bread loafs do not need a second rise time, like a traditional loaf. The bread doesn’t have enough structure to rise “up,” and instead will flatten out and fill the shape of whatever you are making (Note: you CAN do a second rise time with no knead focaccia, which is a flatter bread type.) The lack of a second rise results in two things: first, a faster overall time to make. And the second: it won’t have as many holes as a kneaded bread dough. While I love a good fluffy artisan bread with holes for days, I think the pros here outweigh the cons. The bread DOES have some good holes, it’s got a great texture, and the fact that it’s so easy and hassle free is enough to make me never want to make a kneaded artisan loaf again!
How to make no knead dough
You only need water, yeast, flour, and salt for this no knead bread dough.
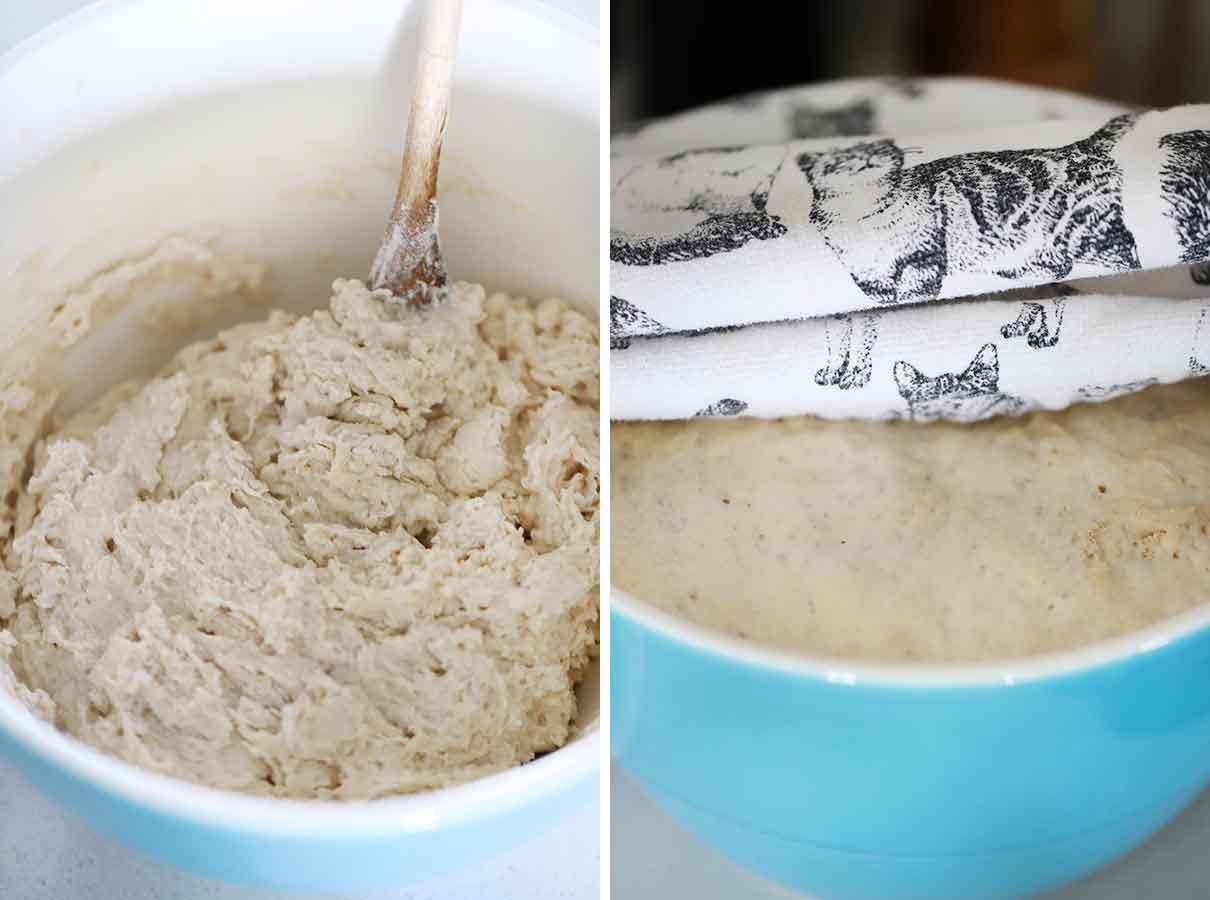
First, warm the water (1.5 cups) to about 100 degrees F. A little more or less is fine. I usually measure it in my pyrex measuring cup and put it in the microwave for about 40 seconds, then take the temperature with a meat thermometer to make sure it’s the right temp. Don’t go any hotter than 110 degrees F – it might kill the yeast. Then, add the warm water to a large bowl, along with a packet of yeast, or 2.25 teaspoons (instant or active dry is fine) and 1/2 tablespoon of table salt (or 2 teaspoons kosher salt). Whisk together until the yeast and salt are dissolved. Finally, add the flour – 3.25 cups – all at once, and stir with a wooden spoon until everything is uniformly wet.
I like to use a silicone spatula to scrape the dough off the wooden spoon, as it will be quite sticky and loose.
Letting the dough rise
Once the dough is mixed, just cover it with a kitchen towel and let it rise in a warm-ish spot for two or three hours. It should double in size at least. If your house is cold, I recommend turning your oven on for a few seconds, turning it off, and placing the bowl in the warm oven with the door closed to trap the heat in. If you’re using your oven to cook something (or in the next step when you need to preheat your Dutch oven), you can leave the bowl on top of the stove- the vented heat at the top will help it rise well. You can also get some really hot water in a mug or glass measuring cup, stick it in the microwave, and place the bowl next to it. Shut the door to the microwave- this will trap the warmth and steam inside. If your house is warm, you can just leave it out. If it’s warm outside, you can leave the bowl outside.
Storing the dough in your fridge
After the dough has risen for 2 hours, you can bake it immediately. But if you like, you can stick it in your refrigerator for up to 7 days until you’re ready to bake it! Cold dough is a little easier to handle, so that’s a pro for this. I recommend using plastic wrap or something more airtight to cover the bowl when you put it in the fridge. If you know you are making this dough days in advance, you can mix it up in a container, keep the lid on ajar while it’s rising and then seal the lid when you put it in the fridge. The taste will get funkier as time goes on- by the 7th day, the bread will taste more like sourdough. And the dough will collapse over time- don’t worry about this.
Preheating the Dutch Oven
You want your Dutch oven to be good and hot for baking the bread so it gets a chance to crisp up properly on the outside. About 30 minutes to an hour before you want to bake the bread, place the Dutch Oven, with the lid on, on the center rack of your oven and turn your oven on to 450 degrees F. Once it reaches 450, keep preheating the Dutch Oven for about 20 minutes. Be very careful when handling the hot Dutch oven, as it’s very heavy and gets searing hot.
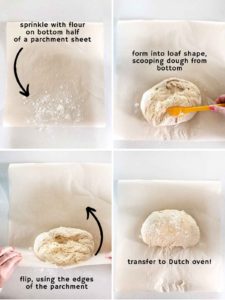
Forming the loaf
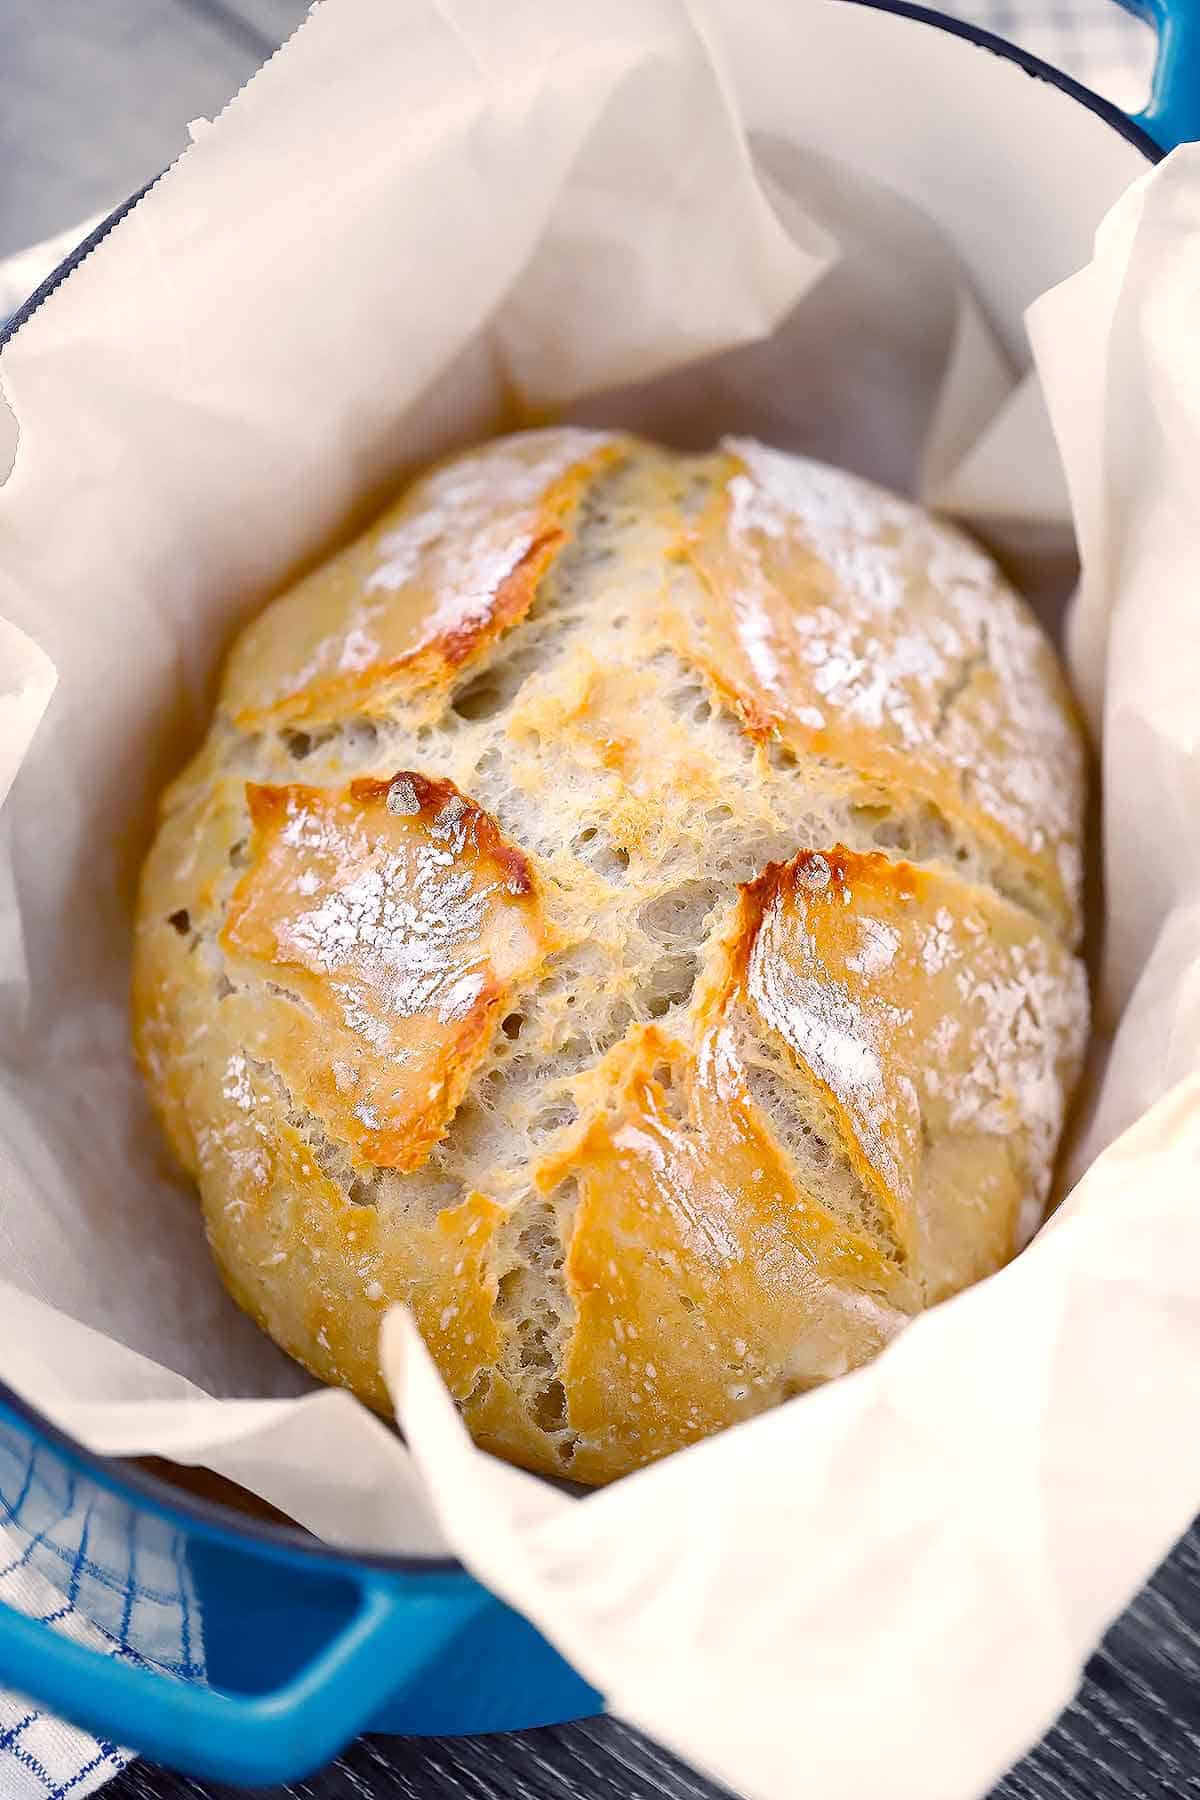
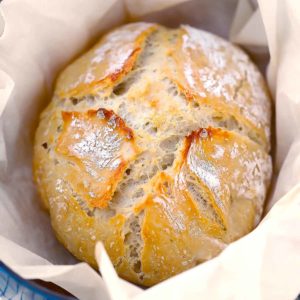
Here’s my favorite part! This is how to make the sticky mess of a dough into a loaf without having to touch it with your hands. At this point, before putting it in the Dutch oven, you can use a very sharp knife or clean razor blade to make a few cuts about 1/2″ deep in the top of the loaf. I did this with mine in a cross shape from end to end in both directions. This will help it rise up a little more in the oven and get some browner crustier bits. But it’s totally optional.
Baking the bread
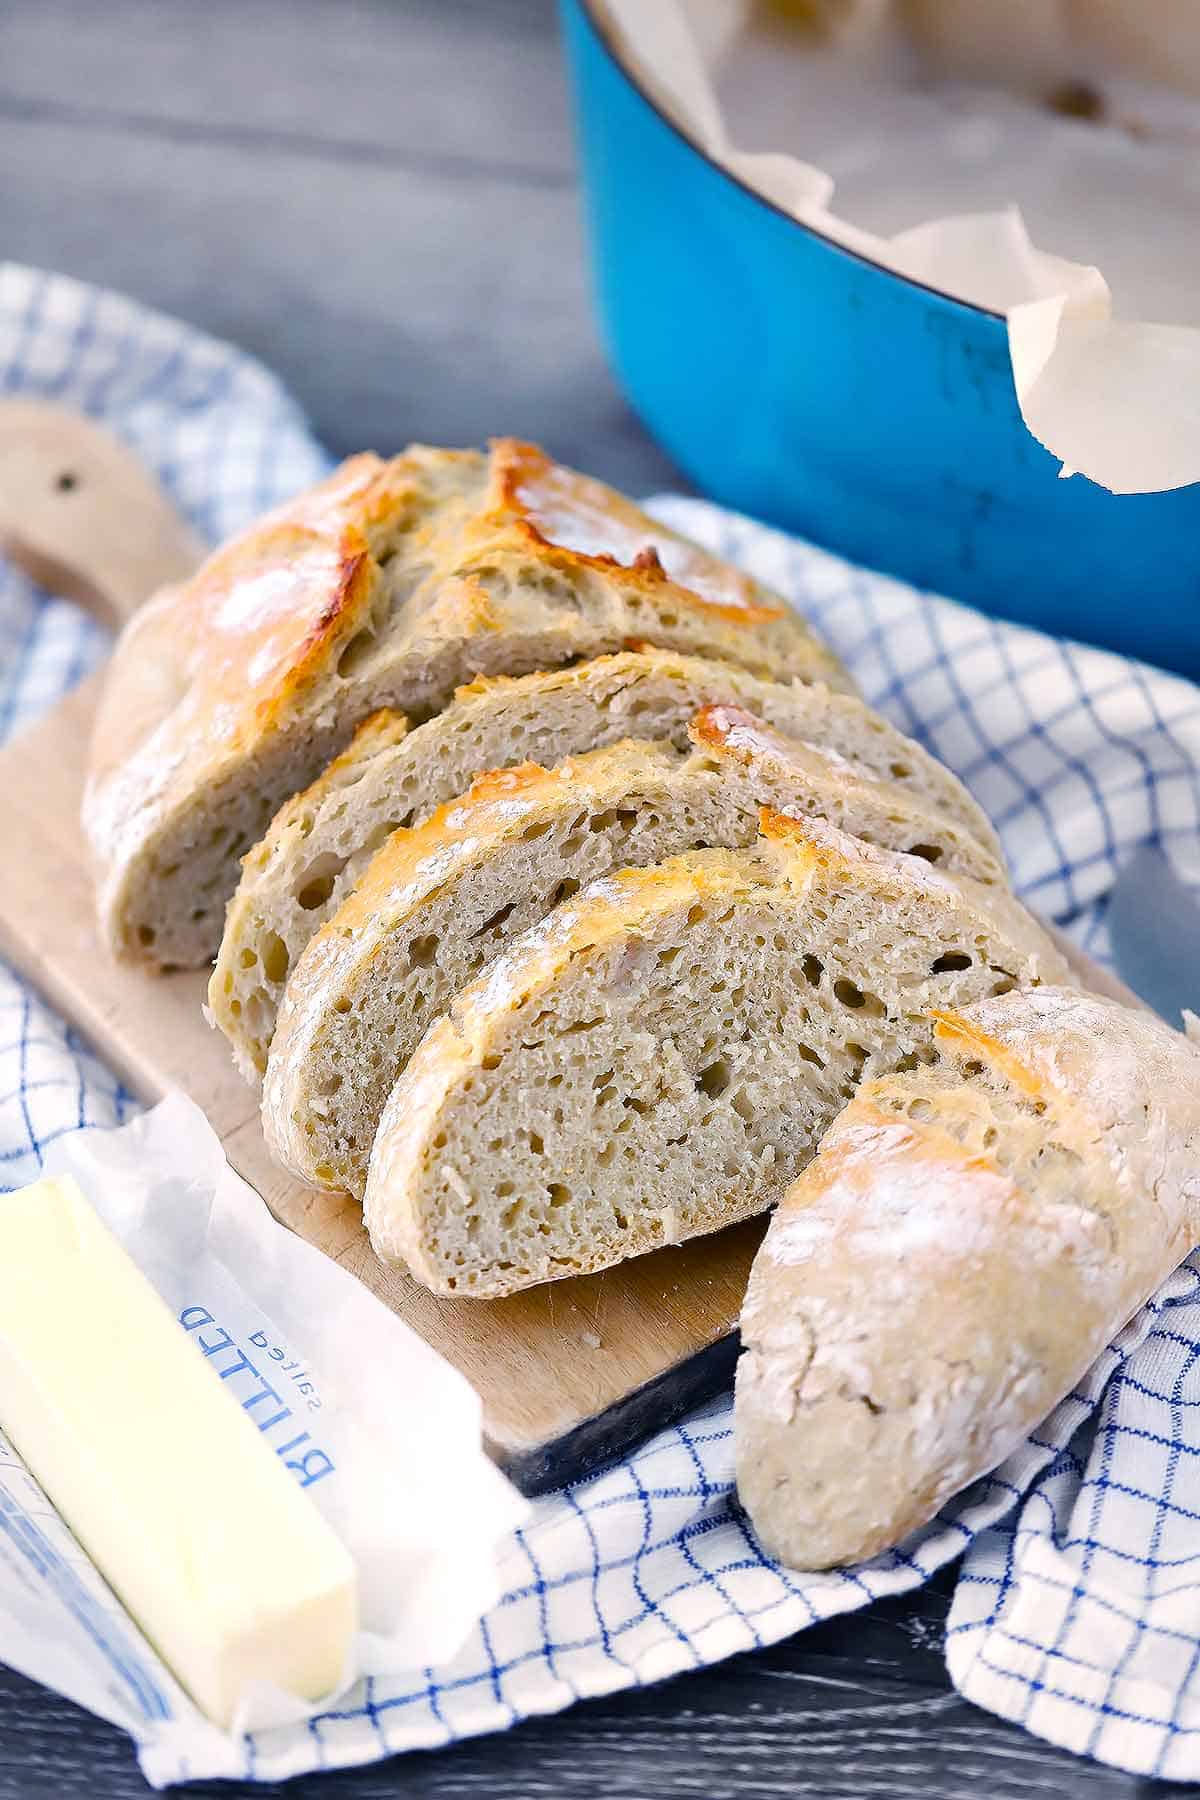
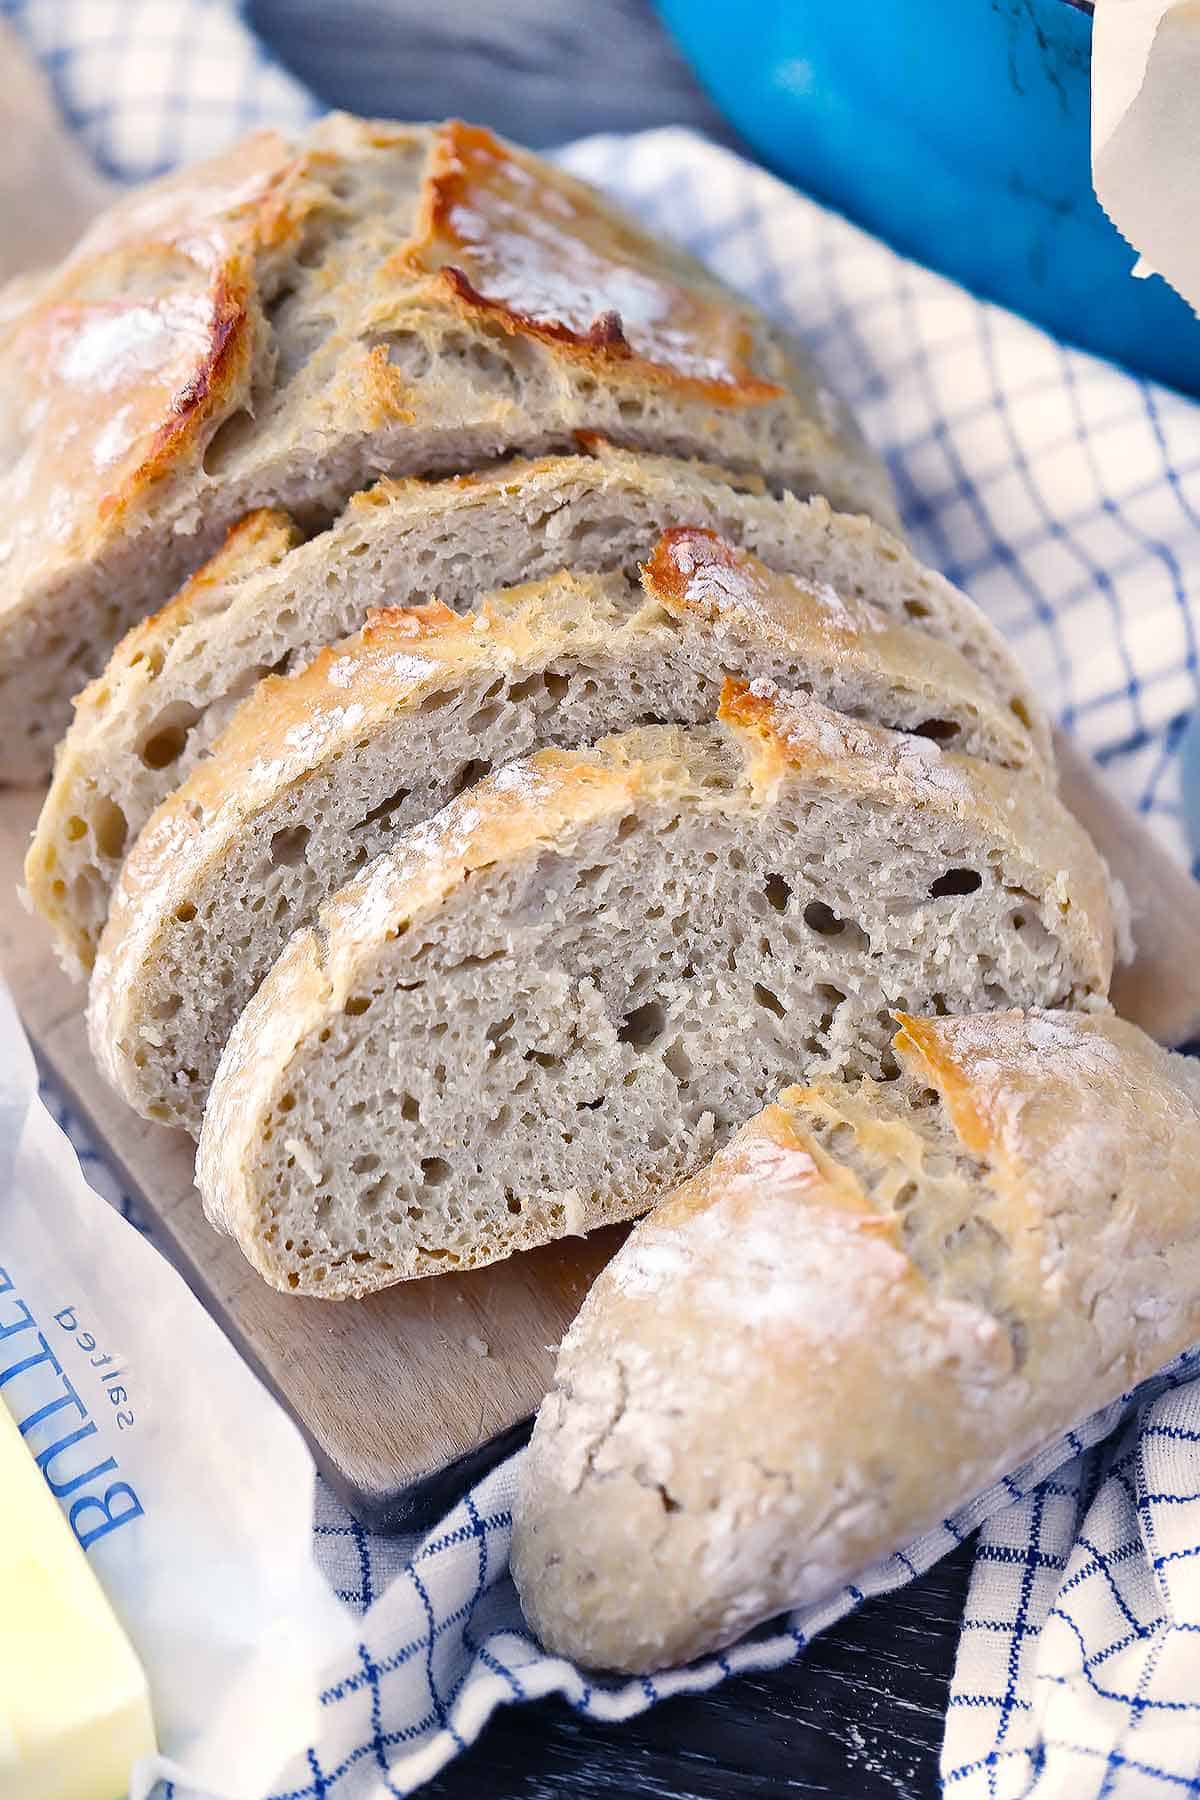
Once you have the loaf shape in the center of your parchment, open your oven door and take the lid off the Dutch oven (USING POTHOLDERS of course). Then, grab the sides of the parchment paper and transfer the loaf to the Dutch oven. Place the cover BACK ON (USING POTHOLDERS FOR THE LOVE OF GOD), and bake at 450 degrees for about 35 minutes. I know I keep yelling about potholders but too often I’ve reached absentmindedly for the lid of a Dutch oven thinking it’s going to be cool but it’s searing hot. It’s easy to make that mistake! Once the 35 minutes are up, take the lid OFF, and bake for another 5-10 minutes, until it’s golden brown. Stop for a moment, and inhale deeply. The smell of fresh-baked bread is one of the best things in the world. Finally, remove the bread by holding the parchment paper, and place on a wire rack or a cutting board to cool. You want it to cool for at least 10 minutes before slicing. AND YOU’RE DONE! Congrats on your gorgeous artisan Dutch oven bread!
Why does the lid to the Dutch Oven need to be on while it bakes?
The key to moist bread with a perfectly crusty crust is that it needs to be baked in a humid environment. I know it seams counter-intuitive, but it really works. The lid to the Dutch oven traps the steam from the sticky dough inside, making it a perfect bread baking environment. Then, taking the lid off for the last bit of cooking helps really brown the top of the loaf without it over-drying. It’s truly a miracle to behold. And it’s why we can call it “artisan bread!”
But what if I don’t have a Dutch Oven?
Glad you asked. This bread is possible to make without a Dutch oven, but you won’t get the same amazingly crusty results. Don’t let that stop you- just temper your expectations a bit. You can bake the bread, on parchment paper since the dough is so sticky, on a baking sheet or, preferably, in a preheated cast iron skillet. Here’s what you can do to help make it extra tasty with a crusty crust. Create a humid environment in your oven by placing a rimmed baking sheet on the bottom rack while the oven preheats. When you add the bread to the oven, pour about 4 cups of water onto the preheated baking sheet. This will create steam as the cold water hits the hot metal. Close the oven door as fast as you can to trap the steam inside.
Can I use another kind of flour?
I used all-purpose for this crusty artisan bread, but you can use bread flour if you like. You can also use part whole wheat flour– I recommend substituting 1 cup of the AP flour with whole wheat. A 100% whole wheat loaf has not been tested, but it might work. I haven’t tried using a gluten-free flour mix for this and therefore cannot recommend it. Here’s a gluten-free artisan bread that might be helpful for you! And finally, you should never substitute a non-flour flour, such as almond flour or chickpea flour, for AP flour. Those won’t work with this bread.
Wait- don’t I need sugar to make bread?
Nope! Some people thing you MUST use sugar in bread or dough recipes so the yeast have something to eat. While yeast do love sugar, and adding sugar to dough can cause a more rapid rise time, it’s not necessary. Yeast love to eat flour too (which is a carbohydrate just like sugar, so acts in a similar way). So you don’t need sugar in this no knead bread recipe at all!
Can I freeze it?
Yes! The bread stays good at room temperature in a plastic bag or airtight container for about 2 days, and it will get staler as time goes on. Any longer than 1-2 days, and you should freeze it. You can freeze the loaf whole if you like- you’ll just need to leave it out for about 12 hours before you can slice into it. Or, you can slice it before freezing, which enables you to take out one slice at a time for toast or sandwiches. Here are some tips for freezing:
Store the whole loaf or sliced loaf in an airtight bag, squeezing out as much air as possible. This will help prevent freezer burn. Wait until it’s COMPLETELY cool before storing, especially if you’re slicing it before, as the slices may stick together if you don’t.
It should stay good for 2-3 months in the freezer if stored properly.
Why didn’t my dough rise?
If your dough doesn’t rise, it is likely an issue with the yeast itself. Yeast is a living organism and needs to be able to eat food and multiply in order to cause a rise. As they multiply, they release gasses, which causes the airy pockets in the dough. Here are three reasons why your dough may not be rising: If your dough won’t rise, my advice is to start anew with brand new yeast and make sure to measure the temperature of your water with a thermometer – I love the Thermoworks Thermapen for a super fast, accurate read! Alternatively, you can stick your finger in the water and it should be about body temperature, so if it feels neutral or slightly warm you should be good!
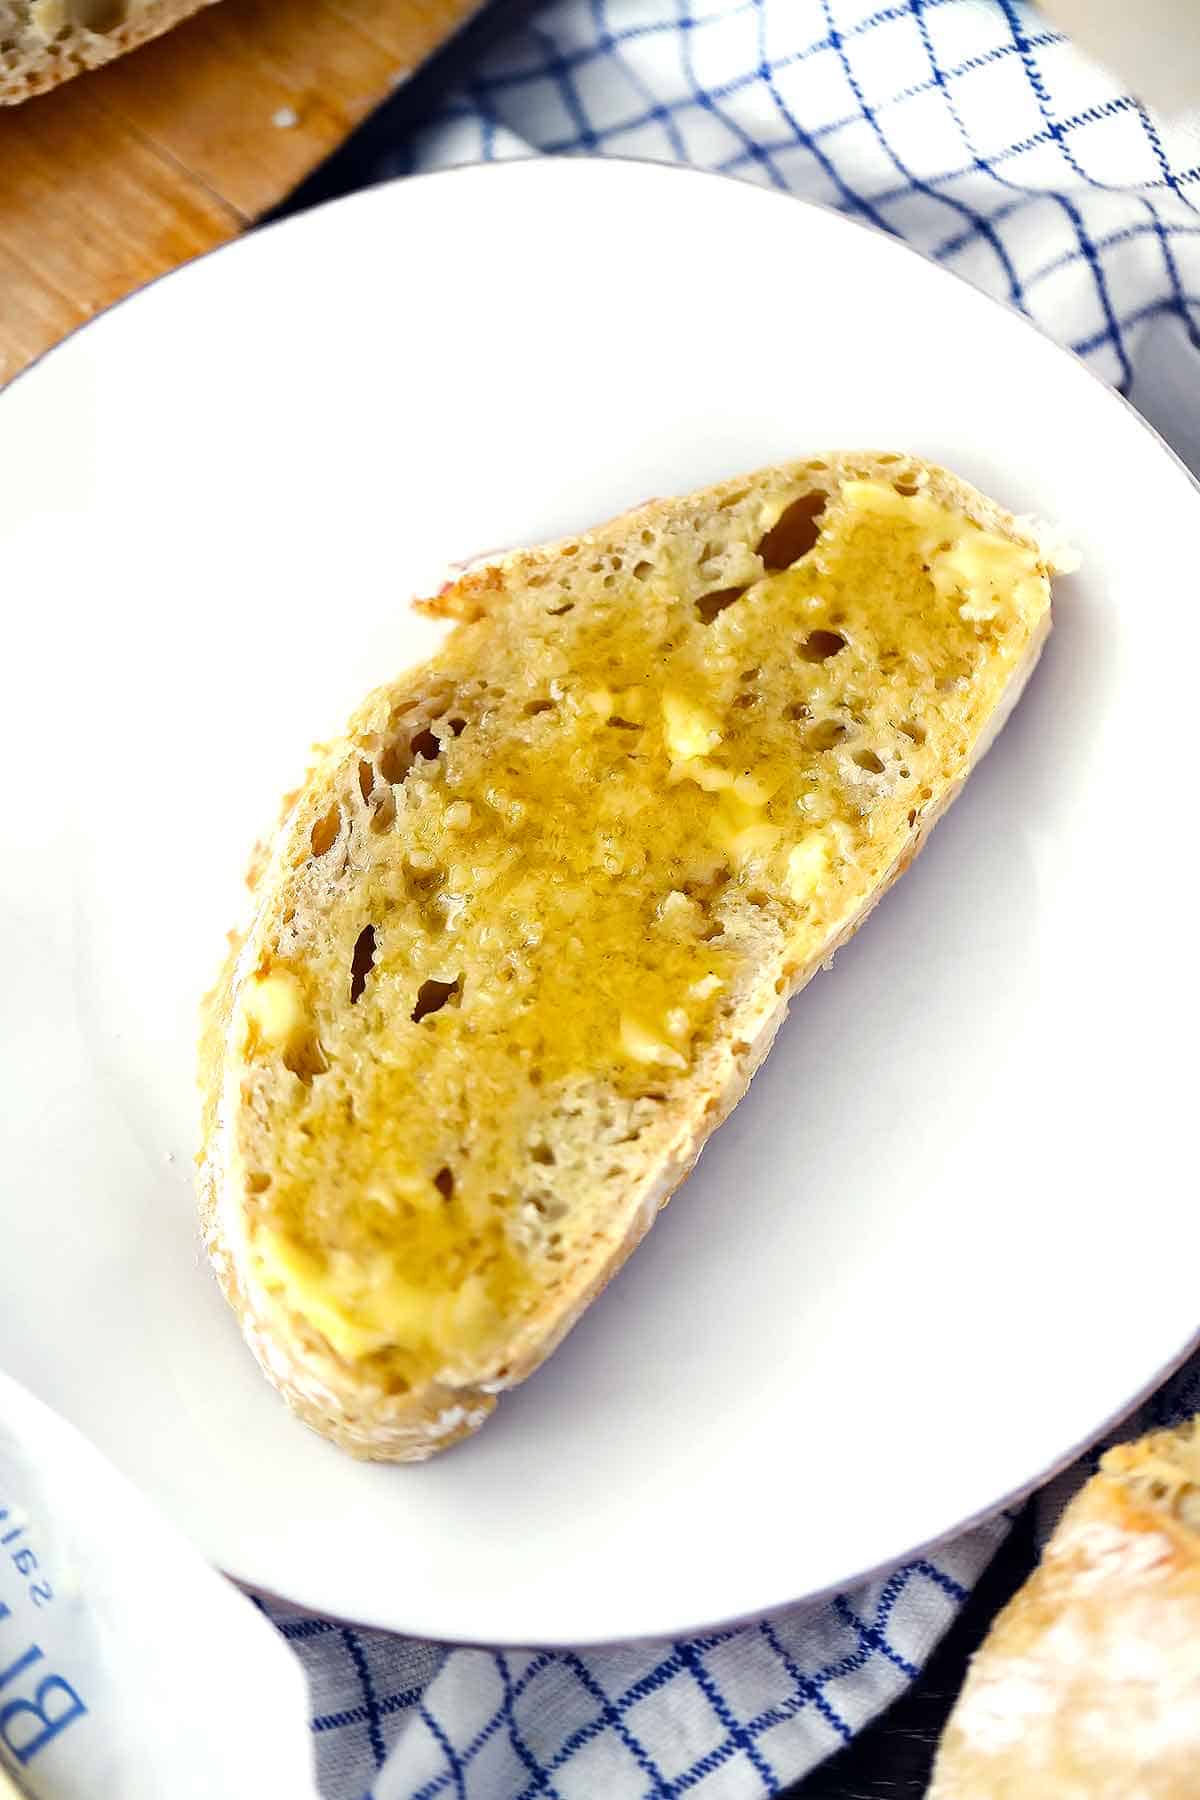
How to serve an artisan bread loaf
I’m a big fan of eating the bread smeared with salted butter and drizzled with honey, as pictured above. But this homemade bread would be delicious…
Served with a hearty soup, like split pea soup or lentil soup. Used for a fancy grilled cheese, like this leek and gruyere grilled cheese. To make cold sandwiches, like this fresh mozzarella, tomato, and basil sandwich with balsamic glaze. Served sliced with a basic olive oil and balsamic bread dip, as a side to your favorite Italian pasta recipe (like this five-ingredient pasta with Bolognese sauce). Used to sop up the sauce from classic shrimp scampi.
What to make with the stale bread
If you forget about the bread and leave it out at room temperature for more than a couple days, it may go stale. I hardly ever have this happen, as my family and I inhale the entire loaf in one sitting usually. But there are a few things you can do with the leftover stale bread! Here are my favorites:
Make homemade croutons with it Use it in Panzanella salad Make a Tuscan Tomato and Bread soup
Do I HAVE to preheat the Dutch Oven?
No. I’ve made this plenty of times putting the loaf into a cold Dutch Oven and then baking for an extra 5-10 minutes with it covered. Preheating the Dutch Oven before baking the no knead bread can help get it a taller rise while baking, since it will start baking faster and more rapidly. But if you are concerned about preheating your Dutch Oven while it’s empty, as some manufacturers recommend not to do, or if you want it to just be a little easier/safer, feel free to skip this step!
How can I add other ingredients to the dough?
Once of the most common questions I get for this recipe is “Can I add herbs and cheese?” or “Can I add jalapenos and cheddar?” YES! It’s SO easy to add other ingredients to no knead bread. Just add whatever other ingredients you want when you mix the dough together. Let it rise with all those ingredients, and then shape and bake as directed. You may even want to sprinkle the top with some extra ingredients. For example, sprinkle with grated parmesan or cheddar cheese, or brush with olive oil and sprinkle with rosemary and sea salt. One thing to keep in mind: if you add ingredients with moisture, such as rehydrated dried fruit, olives, or pickled jalapeños, you will need to drain them very well and/or add less water to the mix. It’s not a huge deal, as this recipe doesn’t require a super exact ratio of liquid to flour, but keep in mind that extra moisture may affect outcome a little bit. Here are some suggestions for no knead bread flavors:
Jalapeño and Cheddar – add drained pickled jalapeños and grated or cubed cheddar cheese. Grated cheese will melt into the dough and flavor the whole thing, while cubed will maintain its shape and create melty pockets of cheese. Rosemary and Sea Salt – add chopped fresh rosemary to the dough, and before baking brush the top with olive oil and sprinkle with extra rosemary and a sprinkle of sea salt. Herb and Parmesan – add a medley of fresh or dried herbs to the dough, as well as grated parmesan. Sprinkle the top with extra herbs and parmesan after brushing with olive oil, if you want. Olive – add well-drained olives to the loaf. Whole or chopped, depending on how big you want them in the final thing. This is also great paired with the rosemary and sea salt or herb and parmesan combo above. Cinnamon raisin – let some raisins soak in warm water for a few minutes to plump up, drain well, and add them, along with some cinnamon, to the dough. You may want to add a little sugar to the dough as well here – this may cause a faster rise time, since yeast love sugar, so keep that in mind. Here’s a more detailed post on how to make cinnamon raisin no knead bread!
There are so many other ways to play around with other flavor combos- I’d love to hear about them in the comments!
Other easy yeast bread recipes
Quick and Easy Dinner Rolls Vasilopita (Sweet Greek New Year’s Bread) Whole Wheat No-Knead Focaccia with Rosemary and Sea Salt Honey Whole Wheat Pizza Dough White Sandwich Bread (from The Brown Eyed Baker)
Check out all my homemade basic essential recipes here. I also LOVE using my Dutch oven to roast a whole chicken. Did you know commenting and rating recipes is one of the best ways you can support your favorite food bloggers? If you made this Dutch Oven No Knead Artisan Bread, please click the stars below to comment and Rate this Recipe!